|
Thank you for visiting.
Click here for the Japanese(日本語) version
My name is Kitao Nakamura, the developer of the PC Engine emulator
Ootake.
In recent years, many re-released retro games—especially
classic arcade titles— have been
published with their pixel aspect
ratios (the shape of each character pixel) either ignored or
determined incorrectly.
As a result, the true quality of these
masterpieces is often not fully conveyed.
In Gradius II, a pixel‑by‑pixel display is exactly the world
the
designers intended. * pixel‑by‑pixel = 1:1 pixel mapping
Gradius II is a masterpiece that has been re-released many
times over the years.
However, in three of the recent
re-releases—Arcade Archives Gradius II, Arcade Classics
Anniversary Collection, and Gradius: Origin Collection—the
default setting stretches the original 320x224 game
image to fill a 4:3 virtual TV screen.
This results in the pixels being vertically stretched by a
factor of 1.07, making the character designs appear unnaturally
tall.
This is clearly incorrect. Anyone who has
actually played the game may notice that the artificial sun in
Stage 1 looks far too thin vertically.
And those who own
the original PCB will immediately see that the square test grid
pattern shown at boot is no longer square under this display
method—it becomes noticeably elongated vertically
↓The default display in the Origin Collection.
The test grid becomes vertically elongated.
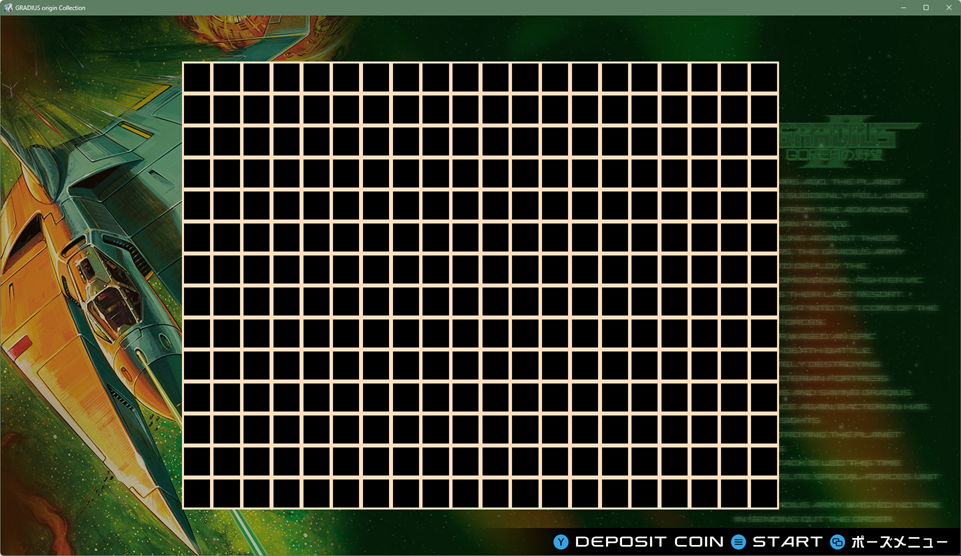
Source:『Gradius: Origin Collection』(©
Konami Digital Entertainment)
↓Display using the Origin Collection’s "Dot by Dot
(pixel‑by‑pixel)" setting.
The test grid now
appears as perfect squares.
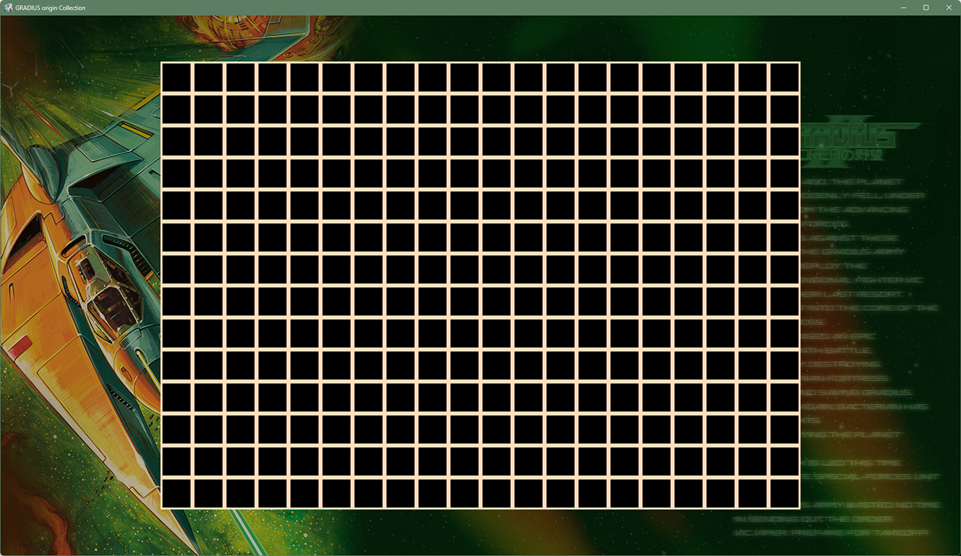
Source:『Gradius: Origin Collection』(©
Konami Digital Entertainment)
This white mesh test grid was the key tool arcade staff used to
adjust the pixel aspect ratio on CRT monitors.
By tuning
the display so that this test pattern appeared as perfect
squares, the staff ensured the game looked as natural as
possible—exactly as the developers intended.
In Gradius
II, each black square in the test grid is displayed as 14x14
pixels—perfect squares with the same number of pixels vertically
and horizontally.
This strongly suggests that the
developers intended the CRT to be adjusted so that each
pixel appears as a square pixel.
* On
modern PCs and consoles, this corresponds to a true
pixel‑by‑pixel (1:1) display.
Once the
display is adjusted correctly, the artificial sun in Stage 1 no
longer looks unnaturally thin.
Even that slight roundness
makes a surprisingly big difference in how the game feels—the
sun simply has more visual impact.
Naturally, this also
changes how enjoyable the game feels after playing.
↓The default display in the Origin Collection.
The artificial sun appears vertically stretched.
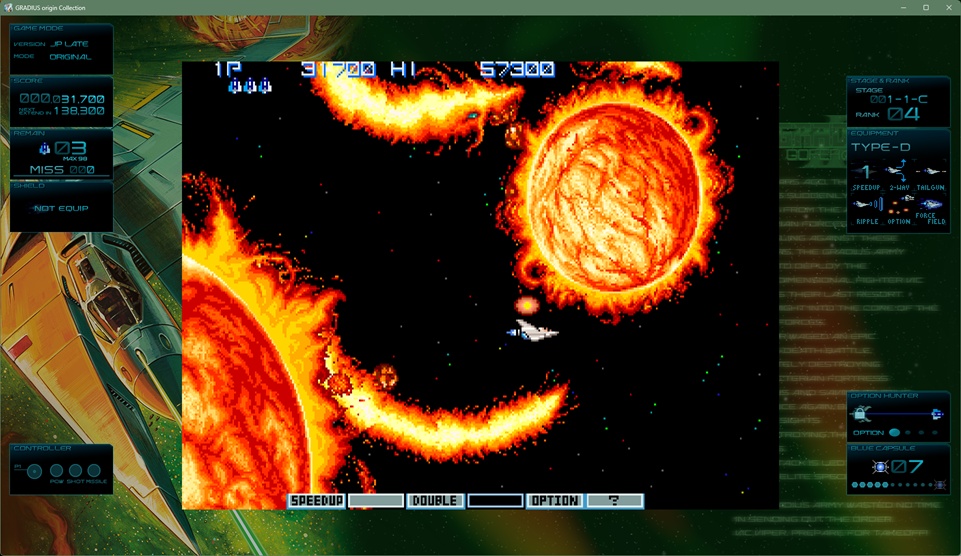
Source:『Gradius: Origin Collection』(©
Konami Digital Entertainment)
↓Display using the Origin Collection’s "Dot by Dot
(pixel‑by‑pixel)" setting.
The artificial sun
now appears properly round.
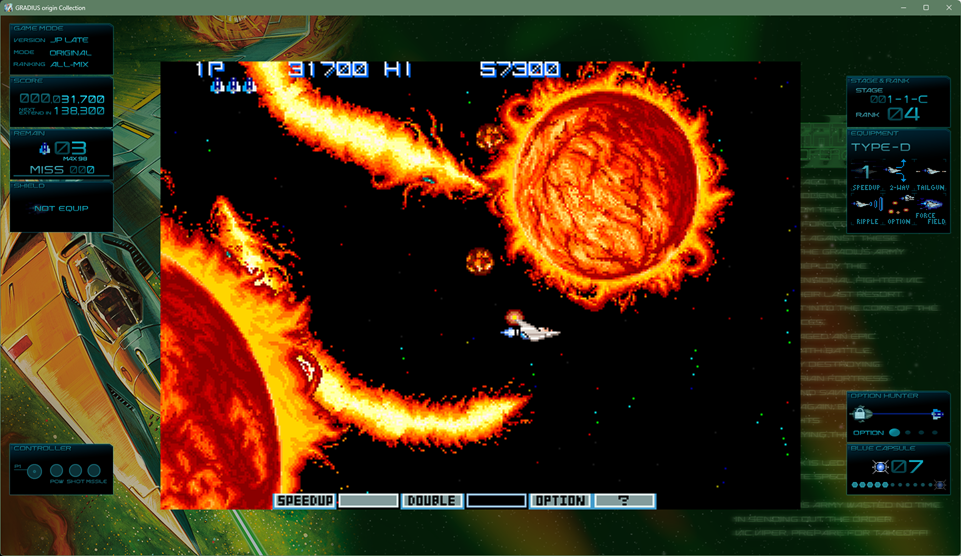
Source:『Gradius: Origin
Collection』(© Konami Digital Entertainment)
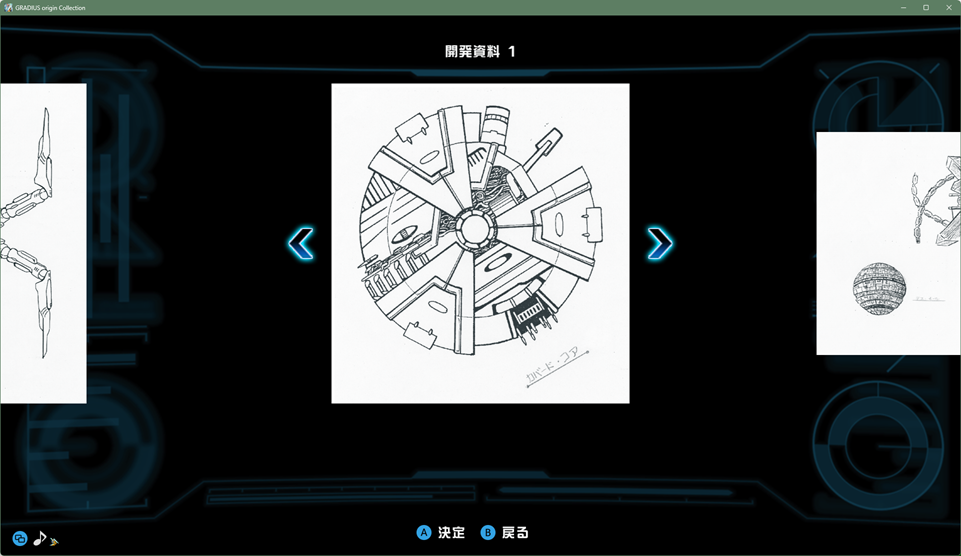
There is another decisive piece of evidence that Gradius II was
meant to be displayed pixel‑by‑pixel.
It lies in Stage
7’s boss, the Covered Core. According to design materials from
the original character artist, the Covered Core was
drawn as a perfect circle.
This clearly
indicates that the intended aspect ratio was one in which
circles appear truly circular.
↓Design materials
from the original artist. The rotating cover of the
Stage 7 boss, the Covered Core, is drawn as a perfect circle.
Source:『Gradius: Origin Collection』(©
Konami Digital Entertainment)
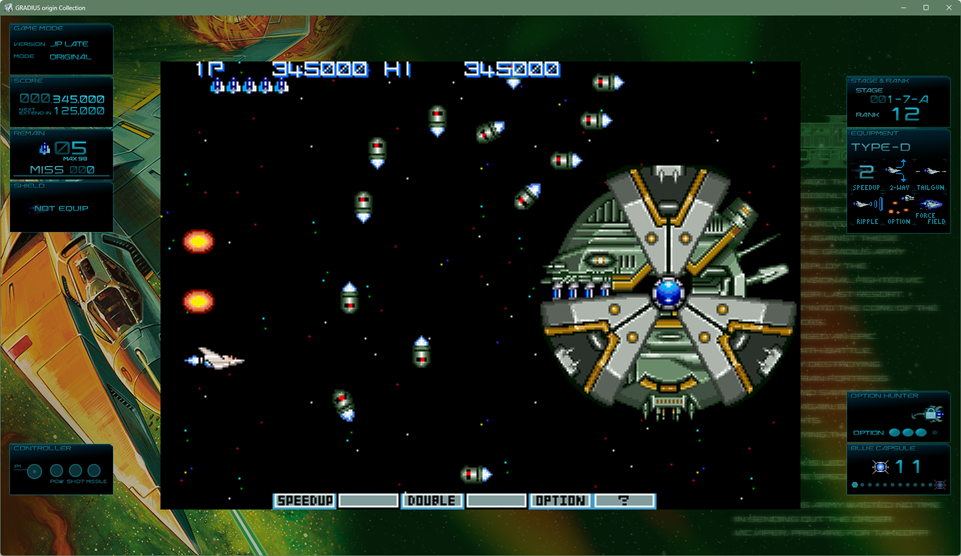
↓Display using the Origin Collection’s "Dot by Dot
(pixel‑by‑pixel)" setting.
The cover also
rotates as a perfect circle in‑game.
Source:『Gradius: Origin Collection』(©
Konami Digital Entertainment)
In the three currently available versions of Gradius II, the
Covered Core is slightly horizontally compressed by default,
causing it to appear vertically stretched.
As a result, the
cover no longer rotates as a perfect circle, breaking the
intended visual effect.
Earlier releases had similar
issues due to hardware limitations:
the PC Engine version
(horizontal pixel ratio x1.14), the PlayStation version (x0.80),
and the Sega Saturn version (x0.91) all deviated noticeably from
true square pixels.
Of course, even with incorrect pixel
aspect ratios, the game is still highly enjoyable—it’s a
masterpiece with far more to offer than just visuals.
But
when it comes to truly falling in love with the
experience, I personally feel that an inaccurate pixel
aspect ratio becomes a significant handicap.
One more thing I noticed while capturing images from the
Gradius: Origin Collection was the way certain sound effects
behaved.
In particular, the Ripple Laser in Gradius II
normally has a very satisfying sound, but in this release it
consistently felt unpleasant to my ears. I sincerely hope this
can be improved in a future update.
Another issue was
that lowering the volume below 100 caused the overall sound
pressure to drop significantly.
I personally worked
around this by raising the volume from the default value of 70
up to 100.
That said, the large amount of included materials
and the extensive sound gallery are truly excellent.
|
For Andor Genesis in Xevious, the
designer’s intended world is one
built around perfect squares.
Let’s look at another title—Xevious, the classic that
introduced players to its world with its imposing boss
characters.
In the recent Arcade Archives release of
Xevious, the default setting stretches the original
224x288‑pixel game screen to fill a virtual 3:4 vertically
oriented display.
As a result, the pixels are
horizontally compressed to about 0.96x, making the character
designs appear slightly elongated vertically.
The
distortion is small enough that many players may not notice it.
However, longtime Xevious fans will likely spot it the moment
they face Andor Genesis—realizing that it’s not quite the
perfect square it’s supposed to be.
Anyone who owns the
original arcade PCB would also notice that the square test‑grid
pattern (the white mesh shown at boot) no longer appears as true
squares under this display method, but instead becomes slightly
vertically stretched.
↓Left: image horizontally compressed to 0.96x (equivalent to the
Arcade Archives default). Right: pixel-by-pixel (1:1 pixel
mapping).
 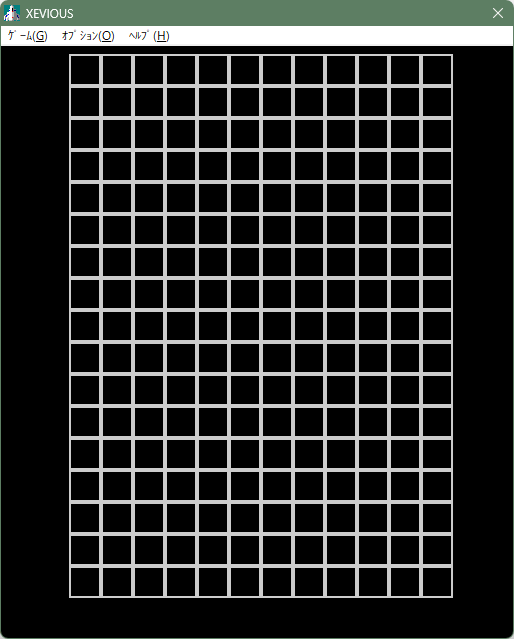
Source:『Windows 95/98 version of
Xevious (publisher: MediaKite)』(© Bandai Namco Entertainment
Inc.)
The test grid in Xevious also displays black squares at 14x14
pixels, meaning each square has the same number of pixels
vertically and horizontally.
This strongly suggests that
the developers intended the CRT to be adjusted so that each
pixel appears as a true square.
* On modern PCs
and consoles, this corresponds to a 1:1 pixel-mapping
(pixel-by-pixel) display.
When adjusted this
way, Andor Genesis becomes a perfect square, matching exactly
how we remember it. Its presence — that distinctive look it has
precisely because it is a square — finally returns.
For
players who experienced the game through retro PC ports, this
accuracy can bring back old memories and even change how
enjoyable the game feels after playing.
↓Left: image horizontally compressed to 0.96x (equivalent to the
Arcade Archives default). Right: pixel-by-pixel.
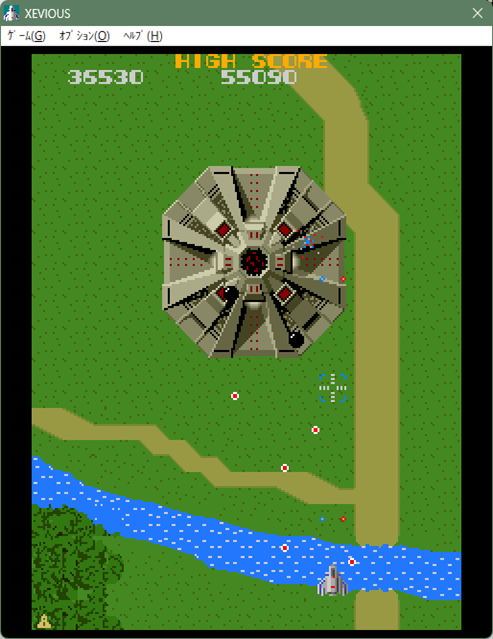 
Source:『Windows 95/98 version of
Xevious (publisher: MediaKite)』(© Bandai Namco Entertainment
Inc.)
There is another decisive reason why pixel-by-pixel
display is the correct way to view Xevious.
Andor Genesis
was also released as plastic model kits and stickers, and
in every case it is depicted as a perfect square.
By
contrast, earlier ports such as the PC Engine version and the
Famicom version (with a horizontal pixel ratio of 1.14x)
deviated significantly from a true square due to hardware
limitations.
To repeat the point: even if the pixel
aspect ratio is incorrect, Xevious is still an outstanding game
with so much going for it that you can absolutely enjoy it.
However, whether you end up loving the game as deeply
as many fans do can be heavily affected if the pixel aspect
ratio is wrong. That is my personal view.
One possible
reason this 'close enough is fine' mindset has spread is that
the default settings in MAME, the arcade-board emulator, use a
similar aspect-ratio calculation.
Because of that, more
and more recent releases seem to assume that if others are doing
it this way, then it must be acceptable for them as well.
Both the Arcade Archives version and the Origin Collection
version allow you to switch to a pixel-by-pixel display, so it
is not a fatal issue.
However, most players will
naturally start by playing with the default settings.
So, does a correct method for determining the proper
pixel aspect ratio actually exist?
We will explore that in
the next chapter.
|
What should be used as the basis for determining
the correct
pixel aspect ratio
【1】.For games that display a test grid pattern at startup or in
test mode, aligning it to a perfect square is almost always
correct.
The very fact that the game displays a test grid pattern is
essentially the developer’s way of saying, 'Please adjust this
so the squares are perfectly square.'
Back in the day,
arcade operators would look at this white grid pattern and
adjust the aspect ratio accordingly.
* Update
(January 14): I found an article that documents how
these adjustments were actually done in real arcades.
Another Day at Hey, Day 21 Game Culture Preservation Institute
According to it, what I refer to here as the test grid was often
called a 'crosshatch' on site, which also matches how many
arcade PCB manuals described it."
If the test grid
pattern contains square cells with the same number of pixels
vertically and horizontally, it means the developers intended
the game to be displayed pixel-by-pixel.
Therefore, when
such a game is re-released or ported, a pixel-by-pixel display
is the optimal choice. (Examples include the original Gradius,
Gradius II, and Xevious.)
* The only major exception
is Capcom’s CPS hardware (Daimakaimura, Final Fight,
Street Fighter II, etc.).
If you align its test grid
to a perfect square, the characters become noticeably wide, so a
different method of adjustment is required."
Home consoles of the Famicom and PC Engine
era did not output square pixels due to cost constraints.
However, many arcade boards—where higher manufacturing costs
were acceptable—were designed from the beginning to display each
pixel as a true square (pixel-by-pixel).
For games that
do not display a test grid pattern, the pixel aspect ratio must
be determined using the following method.
【2】.Connect the arcade board to a CRT monitor set to its
standard settings, and treat the pixel aspect ratio that appears
without any adjustment as the correct one.
In this context, 'standard settings' refers to a state in which
a CRT monitor displays a television broadcast without any
vertical or horizontal distortion. Most CRT monitors were
shipped in this condition.
If a game does not provide a
test grid pattern, there are no other reliable reference points,
so the pixel aspect ratio seen under these standard settings is
treated as the correct one.
* Capcom’s CPS
hardware (Daimakaimura, Final Fight, Street Fighter II, etc.)
is an exception. When displayed under these standard
settings, all characters appear noticeably thin.
Since this
hardware provides no clear reference for adjustment, the aspect
ratio was likely left entirely to the discretion of arcade
staff.
* Irem’s M72 hardware (R-Type, Ninja Spirit,
etc.) is also an exception.
Under standard settings,
characters likewise appear thin, and because the board offers no
test grid or other reference points, operators probably had to
rely on their own judgment.
For both CPS and M72 boards,
arcade staff may have adjusted the aspect ratio by looking at
round elements on screen—such as the circular dots in the R-Type
title logo—and tuning the image until those shapes appeared
correct.
【3】.Arcade staff would adjust the monitor so
that the image appeared as large as possible while keeping the
aspect ratio intact.
Once the aspect ratio had been determined, arcade staff would
typically enlarge the image as much as possible to make it look
appealing.
However, during this process, slight
variations in aspect ratio often occurred depending on the
operator’s personal judgment.
Some operators may have
ignored the intended aspect ratio altogether and simply
stretched the image to fill something close to a 4:3 television
screen.
In fact, this incorrect approach is
essentially how MAME—the arcade-board emulator—determines its
aspect ratio.
From an implementer’s perspective,
stretching the image all the way to a 4:3 frame can appear
reasonable at first glance.
Because of this, not only
MAME but even early versions of my own emulator, Ootake,
expanded the image too far using this method, and several
emulators still rely on this incorrect approach today.
The reason this full‑screen expansion is not correct is that
many arcade boards include black borders—non‑active
display areas—either at the top and bottom or on the sides.
When the image is stretched to fill these inactive regions,
the intended aspect ratio becomes distorted.
Because some
developers of modern re-releases have used this incorrect method
as their reference, many titles end up being sold with an
inaccurate pixel aspect ratio as the default setting.
【4】.The pixel aspect ratio determined using the method described
in 【2】 can be calculated simply by referring to the arcade
board’s specifications, even without physically connecting the
hardware.
Ideally, developers working on modern re-releases should verify
the results using the method described in 【2】.
However,
the same results can be obtained through calculation without
physically connecting the hardware. In practice, when creating a
port, using these calculated values is likely the most accurate
approach.
In the next section, we will look at the
specific calculations used to determine the correct pixel aspect
ratio.
|
How to Calculate the Correct Pixel Aspect
Ratio
【1】.Calculate the pixel aspect
ratio based on the value defined by ATSC (the Advanced
Television Systems Committee) during the digital transition of
NTSC: the 6.136 MHz pixel clock.
This is the only true reference for pixel aspect ratio in
the CRT era.
It defines that, on a television screen
displaying an undistorted broadcast image, a signal output with
a horizontal frequency of 15.734 kHz, a vertical frequency of
59.94 Hz, and a pixel clock of 6.136 MHz will always produce
square pixels (1:1).
Even before this value was formally
defined, actual measurements suggest that the effective pixel
clock was already very close to 6.136 MHz.
Since the
explanation above may still feel abstract, the following section
describes the actual calculation process.
【2】.What Formula Is Used for the Calculation
Older arcade boards and home consoles were designed to output
video compatible with NTSC CRT televisions, which were
originally intended for broadcasting.
As a result, their
output signals use a horizontal frequency of 15.734 kHz and a
vertical frequency of 59.94 Hz, or values extremely close to
these.
NTSC CRTs have a fixed vertical line count of
262.5 lines in non‑interlaced mode.
Therefore,
the only parameter that varies between different arcade boards
and consoles is the horizontal resolution.
And
the factor that determines this horizontal resolution is
the pixel clock.
The pixel clock can be thought
of as the speed at which the hardware’s drawing cursor
processes pixels—not how fast it moves, but how fast it performs
its work.
A higher pixel clock (a faster rate)
allows the system to draw more finely detailed pixels, resulting
in higher horizontal resolution.
From the pixel clock,
the hardware’s pixel aspect ratio can be calculated immediately.
The calculation is as follows:
6.136 ÷ [the pixel clock of
the arcade board being evaluated]
The result of this calculation is the pixel aspect
ratio.
This value represents how much the hardware’s “one
pixel” is stretched vertically or horizontally compared to the
square pixel defined by ATSC at a 6.136 MHz pixel clock.
・Less than 1.0 → a vertically elongated pixel (narrower width)
・Greater than 1.0 → a horizontally elongated pixel (wider width)
This follows from the fact that a higher (faster)
pixel clock allows more pixels to be packed into a single
scanline, which in turn makes each individual pixel narrower in
width.
The pixel clock values for various arcade boards and game
consoles can be found in the MAME source files or on sites such
as the one below.
Page by Pin Eight (administrator of a
long‑standing video‑technology site active since the early
2000s):
Dot clock rates
Note: “Dot clock” refers to the pixel clock."
When
this method is applied to the PC Engine, the resulting pixel
aspect ratio matches extremely well with the image displayed on
real hardware, as well as with the output of Ootake (Real
Stretched) and Mednafen.
Although Pin Eight’s table is
not a primary source, it compiles values based on real hardware
behavior and the MAME source code.
It also includes
values such as the Famicom’s 8:7 ratio, which many emulators
actually adopt.
Given how few people still publish technical
information today, this resource is genuinely invaluable.
It is also possible to derive the pixel clock from the
precise horizontal frequency and the total horizontal pixel
count (including blanking regions).
In the next section,
we will calculate the pixel aspect ratios for the arcade boards
of the original Gradius, Gradius II, and Xevious.
|
Calculating the Pixel Aspect Ratios of
Gradius, Gradius II, and Xevious
【1】.Calculating "Gradius"
Pixel Aspect Ratio
・Pixel clock: 6.14 MHz
6.136
÷ 6.14 = 0.9993
The pixel aspect ratio is
「0.9993」 (approximately 0.07% narrower than a perfect square
pixel, effectively square)
The result
shows only a 0.07% deviation, which is visually
indistinguishable from a perfect square pixel. In practical
terms, it can be treated as square.
Since the original
Gradius displays a test grid pattern at startup, arcade
operators likely used the adjustment knobs to compensate for
individual CRT variations so that the grid’s squares appeared
correctly proportioned.
Because the black squares in the
test grid are 14×14 pixels (already perfectly square at the
pixel level), a pixel‑by‑pixel (1:1 pixel mapping)
presentation is effectively the recommended approach
when porting the game to modern systems that use square‑pixel
displays, such as contemporary consoles or PCs.
【2】.Calculating "Gradius II" Pixel Aspect Ratio
・Pixel clock: 6.14 MHz (TWIN16 board)
6.136
÷ 6.14 = 0.9993
The pixel aspect ratio is
「0.9993」 (approximately 0.07% narrower than a perfect square
pixel, effectively square)
As a result,
because the pixel clock is identical to that of the original
Gradius, the pixel aspect ratio is exactly the same.
The
test grid pattern is also identical, so a pixel‑by‑pixel
(1:1 pixel mapping) presentation can be considered the
manufacturer‑intended display method.
Gradius II
(320‑pixel horizontal output) expands the horizontal visible
area compared to the original Gradius (256‑pixel horizontal
output). The areas that appeared as black borders on the
left and right in the original Gradius now fall within the
visible region.
The important point here is that
even though the horizontal pixel count (listed as "resolution"
in specification sheets) increases, the aspect ratio of
each individual pixel remains unchanged from the original
Gradius.
Pixel aspect ratio is determined
by the pixel clock, not by the number of
pixels.
【3】.Calculating "Xevious" Pixel Aspect Ratio
・Pixel clock: 6.14 MHz
6.136
÷ 6.14 = 0.9993
The pixel aspect ratio is
「0.9993」 (approximately 0.07% narrower than a perfect square
pixel, effectively square)
As it turns
out, Xevious also uses the same 6.14 MHz pixel clock as Gradius,
so its pixel aspect ratio is identical. The test grid pattern is
likewise the same, meaning that a pixel‑by‑pixel (1:1
pixel mapping) presentation can be considered the
manufacturer‑intended display method.
While many
home consoles did not provide true pixel‑by‑pixel output due to
cost constraints, a large number of arcade boards produced
displays that were much closer to 1:1 pixel mapping.
This
pixel‑accurate output on arcade hardware likely made it
easier for graphic designers of the time to perform their
paint‑based workflow on the high‑end computers used for asset
creation.
That concludes this section. Using the same method, it is also
possible to determine the pixel aspect ratios (PAR) of home
consoles, not just arcade boards.
Next, as noted in the
caution section, let’s calculate the pixel aspect ratios of
Capcom’s CPS hardware and Irem’s M72 hardware.
|
Calculating the Pixel Aspect Ratios of
Daimakaimura and R‑TYPE
【1】.Calculating "Daimakaimura
(Ghouls’n Ghosts)" Pixel Aspect Ratio
・Pixel clock: 8.00 (CPS1 board)
6.136
÷ 8.00 = 0.767
The pixel aspect ratio is
「0.767」 (approximately 23.3% narrower than a perfect square
pixel, resulting in a vertically elongated pixel shape)
As a result, the pixels appear significantly vertically
elongated, being 23.3% narrower than perfect square pixels. With
this uncorrected presentation, many viewers would likely feel
that character sprites look noticeably too thin.
Although
the test mode provides a test grid, aligning it to perfect
squares produces characters that appear excessively wide, which
is clearly incorrect.
In the case of Capcom’s CPS
hardware—an outlier in this regard—it is likely that arcade
operators ultimately relied on visually adjusting the image
by looking at round characters or items on screen,
leaving the final tuning entirely in their hands.
【2】.Calculating "R-TYPE" Pixel Aspect Ratio
・Pixel clock: 8.00 (M72 board)
6.136
÷ 8.00 = 0.767
The pixel aspect ratio is
「0.767」 (approximately 23.3% narrower than a perfect square
pixel, resulting in a vertically elongated pixel shape)
As it turns out, the pixel clock is the same as that of
Daimakaimura, so the pixel aspect ratio is identical. However,
unlike Daimakaimura, this hardware provides no test grid display
at all.
On the CPS hardware used for Daimakaimura, the
presence of a test grid actually led to incorrect adjustments,
but Irem appears to have avoided this issue by omitting
the test grid entirely.
For the M72 hardware as
well, it is likely that arcade operators ultimately relied on
visually adjusting the image by looking at round
characters or items on screen, leaving the
final tuning entirely in their hands.
In R‑TYPE,
the title screen displays “R・TYPE,” with a large round
dot between the R and T. Because this screen alternates
frequently with the demo play sequence, operators could easily
use this dot as a reference to adjust the aspect ratio.
The engineers who developed the CPS and M72 hardware appear
to have prioritized achieving the highest possible
resolution within the constraints of the NTSC standard,
even at the cost of making screen adjustment more difficult.
Because NTSC fixes the vertical resolution at 262.5 lines
including the blanking interval, they pushed the
horizontal resolution as far as practical. Increasing
it any further would have required more expensive CRTs, so it is
reasonable to assume that this led to the choice of a 384‑pixel
horizontal display.
Unlike Namco, Konami, Sega, and
Taito—who tended to keep their pixel aspect ratios close to
1:1—these two companies pursued their own distinctive
graphics specifications. As a result, the pixel art
created for these systems still retains its unique brilliance
today.
|
To Preserve the Appeal of These Classics
for Future Generations
If, during the development of the port, the actual arcade
board had been connected to a CRT monitor for verification, the
default setting would likely not have ended up vertically
stretched.
That said, it is also possible that the
developers thoroughly tested the game and intentionally chose
the vertical stretch for their own reasons. There may have been
circumstances we are not aware of, and therefore it cannot be
criticized outright.
Today’s home consoles and PCs have
more than enough performance to scale images without blurring.
As long as either the vertical or horizontal axis is scaled by
an integer factor, visual artifacts remain minimal.
We
are no longer in an era where "hardware limitations make it
impossible to reproduce the correct aspect ratio."
Most
players experience a game in its default settings.
For
that reason, I strongly hope that the very first screen is
presented in a way that does not diminish the appeal of these
masterpieces.
Through such continued efforts, the appeal
of these classic masterpieces will be conveyed deeply to younger
generations, allowing the works to keep living on for many years
to come — and far beyond.
|
2026.1.3-2026.1.15 Written by Kitao Nakamura.
"Ootake" Homepage へ 戻る
|
 Twitter(X)始めました